Thursday, July 2, 2015
If you want to know your way around Red Hat Enterprise Linux distribution, but the you don't have the financial ability to obtain a license. CentOS is your best bet get to the the Red Hat Enterprise Linux official experience. Because CentOS is a binary capatible version of Red Hat Enterprise Linux. Meaning all the things that matters are the same, only the branding and logos are different. CentOS is open sourced and can be downloaded for free. Although it might be a couple of versions behind Red Hat Enterprise Linux. But, you should be able to perform everything you can with CentOS that you can with Red Hat Enterprise. Below is a step by step instruction on how to install CentOS in Oracle VirtualBox.
Step-By-Step Instructions:
1. Type http://centos.org in your browser
2. Click on the "Get CentOS Now" button
Step-By-Step Instructions:
1. Type http://centos.org in your browser
2. Click on the "Get CentOS Now" button
In this blog we are going to create an AngularJS application from scratch we would go step by step and create every file from scratch.
Step-By-Step Instructions:
1. Create an application folder call ACME Bank with the following structure, don't worry about the bower.json and the .bowerrc file yet.
Step-By-Step Instructions:
1. Create an application folder call ACME Bank with the following structure, don't worry about the bower.json and the .bowerrc file yet.
Tuesday, June 30, 2015
One of the first thing you have to do when you are creating a git repository is to create a .gitignore file that tells git to ignore the files specified in the .gitignore file. Since Visual Studio produces all kinds of files it could take a while if you tried to create a .gitignore file from scratch. Well there's a website that will generate a .gitignore file for you. It's called gitignore.io all you have to do is type in the IDE in this case it's VisualStudio without any spaces and the website will generate a .gitignore file for you automatically.
Friday, June 26, 2015
In this blog I am going to show you how to install the Hortonworks Hadoop virtual machine on your local machine using Oracle's VirtualBox. It is free so it's the best way to learn Hadoop if you are just starting out.
Step-by-Step Instructions:
1. Type in the url http://hortonworks.com/products/sandbox-instructions , you will be taken to the Hortonworks sandbox download page.
2. What you want to do is download the latest stable release. Choose the virtual machine version that is for VirtualBox at the time of this writing the file should say VirtualBox(HDP 2.2.4 - 5.4 GB). It's going to take a while.
Monday, June 8, 2015
Older versions of IE have problems supporting the newer JavaScript libraries and HTML5 tags. In the previous blog we've created responsive layout in ASP.NET MVC. In this blog we are going to use conditional comments to support older versions of Internet Explorer (IE). Since IE 9 seems to be the cutoff point we will use it in our conditional comment base condition to decide whether we want to do something different to support IE. We will be working with the MvcApp project.
Step-By-Step Instructions:
1. Open the MvcApp application
2. Open the _Layout.cshtml
3. Inside the <head> tag
Step-By-Step Instructions:
1. Open the MvcApp application
2. Open the _Layout.cshtml
3. Inside the <head> tag
    <!--[if lt IE 9]>
      <script src="https://oss.maxcdn.com/html5shiv/3.7.2/html5shiv.min.js"></script>
      <script src="https://oss.maxcdn.com/respond/1.4.2/respond.min.js"></script>
      <script src="http://ajax.googleapis.com/ajax/libs/jquery/1.11.2/jquery.min.js"></script>
    <![endif]-->
Thursday, June 4, 2015
In our previous blog we created a simple _Layout.cshtml file that does not have any markup just to make things simple. In this blog we will use Bootstrap to make the layout look more professional and responsive, so that it can be viewed in any screen size. The previous layout looks like screenshot below.
Friday, May 29, 2015
The JQuery library by design uses only two global namespace so that it would not conflict with other JavaScript libraries.
- $ - the dollar is used as a reference to JQuery namespace
- Also used by Prototype library, YUI and mootools
- jQuery - is also used to reference to jQuery namespace, this the more unique reference of the two options, but nobody really uses it
So what do you do if you wanted to use jQuey and Prototype on the same page? Well jQuery can concede the $ sign to the other libraries with the code jQuery.noConflict() function
This sample code shows how jQuery gives up the $ sign to the JavaScript library Prototype
Thursday, May 28, 2015
The Northwind sample database is probably the most mention sample database of all time. Most of the tutorials on the web uses the Northwind sample database as an example. However, it's not as straight forward to add the Northwind database to your SQL Server instance as you may have think. The reason is because the Northwind database was initially created for SQL Server 2000. Therefore, most of the newer versions of SQL Server will throw an error when you tried to attach the .mdb file. It is easier to run the SQL script that is provided with the download. In this blog we will go over where to download the Northwind sample database, and how to add to your SQL Server instance using the SQL script.
1. Open your browser and type in the following URL in the address bar
https://www.microsoft.com/en-us/download/details.aspx?id=23654
2. Click on the "Download" button
1. Open your browser and type in the following URL in the address bar
https://www.microsoft.com/en-us/download/details.aspx?id=23654
2. Click on the "Download" button
Wednesday, April 22, 2015
Let's face it, most of us starts blogging so that we can can hopefully retire in the Caribbean using money that we make from our blog. Well to do that we need ads on our blog. In this blog post we will go over the steps to associate, and setup Adsense ads on your Blogger blog.
Step-By-Step Instructions:
1. Log into your Blogger Blog account, then click on Earnings → AdSense
Step-By-Step Instructions:
1. Log into your Blogger Blog account, then click on Earnings → AdSense
Monday, April 20, 2015
Sunday, April 19, 2015
In this blog we will go over how to export your blogs in Google's Blogger blogging application.
Step-By-Step Instructions Exporting Your Blog:
1. Sign into the blog you want to export your blog posts from.
2. Select "Other" in the "Settings" section
Step-By-Step Instructions Exporting Your Blog:
1. Sign into the blog you want to export your blog posts from.
2. Select "Other" in the "Settings" section
Saturday, April 18, 2015
Creating a new blog in Blogger is really easy in fact it takes less than five minutes to do. Well maybe ten minutes if you have to take screen shots. Below is a step by step process of how to create your new Blogger blog.
Step-By-Step:
1. Log into blogger.com with your Google account, you will be logged into the Blogger dashboard
2. In the dashboard there will be button that says "New Blog", click on the button
Step-By-Step:
1. Log into blogger.com with your Google account, you will be logged into the Blogger dashboard
2. In the dashboard there will be button that says "New Blog", click on the button
Friday, April 17, 2015
There's actually two selector parameters in JQuery. The second parameter is the context parameter. The context parameter specify the context that the selector should operate within that context. Let's use the bootstrap form field markup below as an example:
<!DOCTYPE html>
<html lang="en">
    <head>
        <meta charset="utf-8" />
<script src="http://code.jquery.com/jquery-1.11.2.min.js"></script>
<script src="https://maxcdn.bootstrapcdn.com/bootstrap/3.3.2/js/bootstrap.min.js"></script>
<!-- Latest compiled and minified CSS -->
<link rel="stylesheet" href="https://maxcdn.bootstrapcdn.com/bootstrap/3.3.2/css/bootstrap.min.css">
<!-- Optional theme -->
<link rel="stylesheet" href="https://maxcdn.bootstrapcdn.com/bootstrap/3.3.2/css/bootstrap-theme.min.css">
        <title></title>
  <style>
   .form-label-spacing{
    margin-top: 15px;
   }

   .form-group-spacing
   {
    margin-left: 20px;
   }
  </style>
    </head>
    <body>
         <form>
   <div class="row">
   <div class="form-group form-group-spacing col-lg-4 col-md-4" id="registration-form">
    <label for="firstName" class="form-label-spacing">First Name:</label>
     <input class="form-control" type="text" id="firstName" placeholder="First Name">
    <label for="firstName" class="form-label-spacing">Last Name:</label>
     <input class="form-control" type="text" id="lastName" placeholder="Last Name">
    <label class="E-Mail form-label-spacing" for="E-Mail">Email:</label>
     <input class="form-control" type="email" id="E-Mail" placeholder="Email">
    <label class="form-label-spacing" for="password">Password:</label>
     <input name="Password"  class="form-control"  type="password" placeholder="Password">
    <div class="form-group">
     <label class="form-label-spacing" for="gender">Gender:</label>
      <div class="radio">
       <label><input type="radio" name="gender" id="gender">Male</label><br/>
       <label><input type="radio" name="gender" id="gender">Female</label>
      </div>
    </div>

         <button type="button"  class="btn btn-default">Sign Up</button>

    </div>
    <div class="col-lg-8 col-md-8"/>
   </div>
      <div class="row">
   <div class="form-group form-group-spacing col-lg-4 col-md-4" id="another-registration-form">
    <label for="firstName" class="form-label-spacing">First Name:</label>
     <input class="form-control" type="text" id="firstName" placeholder="First Name">
    <label for="firstName" class="form-label-spacing">Last Name:</label>
     <input class="form-control" type="text" id="lastName" placeholder="Last Name">
    <label class="E-Mail form-label-spacing" for="E-Mail">Email:</label>
     <input class="form-control" type="email" id="E-Mail" placeholder="Email">
    <label class="form-label-spacing" for="password">Password:</label>
     <input name="Password"  class="form-control"  type="password" placeholder="Password">
    <div class="form-group">
     <label class="form-label-spacing" for="gender">Gender:</label>
      <div class="radio">
       <label><input type="radio" name="gender" id="gender">Male</label><br/>
       <label><input type="radio" name="gender" id="gender">Female</label>
      </div>
    </div>

         <button type="button"  class="btn btn-default">Sign Up</button>

    </div>
    <div class="col-lg-8 col-md-8"/>
   </div>
  </form>
    </body>
</html>
Thursday, April 16, 2015
In this blog we will turn ordinary form fields to a more modernized and professional looking form fields by using the bootstrap library. Let's say we have the following form fields with no formatting, or layouts applied to it with the following markup.
<!DOCTYPE html>
<html lang="en">
    <head>
        <meta charset="utf-8" />
<script src="http://code.jquery.com/jquery-1.11.2.min.js"></script>
<script src="https://maxcdn.bootstrapcdn.com/bootstrap/3.3.2/js/bootstrap.min.js"></script>
<!-- Latest compiled and minified CSS -->
<link rel="stylesheet" href="https://maxcdn.bootstrapcdn.com/bootstrap/3.3.2/css/bootstrap.min.css">
<!-- Optional theme -->
<link rel="stylesheet" href="https://maxcdn.bootstrapcdn.com/bootstrap/3.3.2/css/bootstrap-theme.min.css">
        <title></title>
    </head>
    <body>
         <form>
   First Name: <input name="First Name" type="text"><br/>
   Last Name: <input name="Last Name" type="text"><br/>
   E-Mail: <input name="E-Mail" type="text"><br/>
   Password: <input name="Password" type="password"><br/>
   Gender:
   <br/><input type="radio" name="gender" value="male" checked>Male<br/>
    <input type="radio" name="gender" value="female">Female<br/>
   <input type="submit" value="Sign-Up"/>
  </form>
    </body>
</html>
Tuesday, April 14, 2015
In the previous blog about selectors we've gone over what a selector is. In this blog we will something that is a little more advance and use JQuery to select the attributes within a HTML element. Most HTML elements have attributes associated with them for example the <input> element has the id, name, and type in them. So let's create a typical registration form input fields for this example and use JQuery to select the form fields according to what attributes the form fields have:
<html lang="en">
    <head>
        <meta charset="utf-8" />
        <title>JQuery Attributes Selector Demo</title>
  <script src="http://ajax.googleapis.com/ajax/libs/jquery/2.1.3/jquery.min.js"></script>
  <script>
  </script>
    </head>
    <body>
  <form>
   User ID: <input name="UserId" type="text"><br/>
   First Name: <input name="First Name" type="text"><br/>
   Last Name: <input name="Last Name" type="text"><br/>
   E-Mail: <input name="E-Mail" type="text"><br/>
   Password: <input name="Password" type="password"><br/>
   Gender:
    <br/><input type="radio" name="gender" value="male" checked>Male<br/>
    <input type="radio" name="gender" value="female">Female<br/>

  </form>
    </body>
 </html>
Monday, April 13, 2015
A lot of you may have wonder why JQuery releases versions 1.x and 2.x, the reason is because the 1.x versions are released to support older versions of Internet Explorer. What a lot of people don't realize is that the 2.x version performs better, so if you have the choice between 1.x and 2.x you should choose the 2.x versions. Use the 1.x versions only if you have to. In this blog we will show how to use conditional comments which Microsoft created in Internet Explorer 5. Since it's specifically created for Internet Explorer other browsers will ignore it. Since Internet Explorer 9 seems to be the divider for support we will use it as the base case for our conditional comments. Here is the code to use the conditional comments to support older versions of Internet Explorer.
<html
    <head>
        <meta charset="utf-8" />
        <title>JQuery Conditional Comments Demo</title>
  <!-- [if lt IE 9]>
   <script src="http://ajax.googleapis.com/ajax/libs/jquery/1.11.2/jquery.min.js"></script>
  <![endif]-->
  <!--[if gte IE 9]><!-->
   <script src="http://ajax.googleapis.com/ajax/libs/jquery/2.1.3/jquery.min.js"></script>
  <!--<![endif]-->
    </head>
    <body>
    </body>
</html>
Friday, April 10, 2015
Selectors are at the heart of JQuery in almost every task you want to perform in JQuery, your initial setup is to use a selector to select an element in the DOM to perform some action on it. So in this blog we will show you some the common selectors that you will have to use in JQuery to get the job done.
First let's make sure JQuery is working by creating an HTML file with a little JQuery test script in it:
First let's make sure JQuery is working by creating an HTML file with a little JQuery test script in it:
<html lang="en">
    <head>
        <meta charset="utf-8" />
        <title>JQuery Selector Demo</title>
  <script src="http://ajax.googleapis.com/ajax/libs/jquery/1.11.2/jquery.min.js"></script>
  <script>
   $(document).ready(alert("jquery is working"));
  </script>
    </head>
    <body>
    </body>
 </html>
Thursday, April 9, 2015
So according to Node.js's official website http://www.nodejs.org, NodeJs is
“a platform built on Chrome’s JavaScript runtime for easily building fast, scalable network applications. Node.js uses an event-driven, non-blocking I/O model that makes it lightweight and efficient, perfect for data-intensive real-time applications that run across distributed devices.”
So what does that mean in English? Well it basically means that Node.js enables developers to use JavaScript like it's a server. Allowing you to do JavaScript server-side like development without the backend servers. Under the hood of Node.js is the virtual machine call V8. If you need something lightweight Node.js should be able to fit the bill especially on the client side.
Here are the steps to step up Node:
1. Go to the website https://nodejs.org/
2. Click on the "Downloads" tab
3. Download the install file for the your system
Wednesday, April 8, 2015
If you use Bootstrap in a local environment it would make sense to use the local version of Bootstrap that you've downloaded from the Bootstrap website. Follow the steps below to setup Bootstrap locally.
Step-By-Step Instructions:
1. Go the website http://getbootstrap.com then click on the "Get Started" tab. You will see three choices for download. You want to click the first button that is labeled "Download Bootstrap"
Step-By-Step Instructions:
1. Go the website http://getbootstrap.com then click on the "Get Started" tab. You will see three choices for download. You want to click the first button that is labeled "Download Bootstrap"
Tuesday, April 7, 2015
In JavaScript there are two kinds of values that most developers often believed to be the same. The "undefined" the "null" values. When understood correctly, they mean slightly different things.
undefined Example: In the example below we are going to examine the "undefined" value, and try to recreate some of the scenarios that an "undefined" value will be returned.
In an HTML file type in the following code:
- undefined : no value has been defined, usually this means that a variable or object has not been defined or declared before you use it.
- null : means that there is a value, but the value is not a valid value
undefined Example: In the example below we are going to examine the "undefined" value, and try to recreate some of the scenarios that an "undefined" value will be returned.
In an HTML file type in the following code:
<!DOCTYPE html>
<html lang="en">
<head>
<title>undefined vs null</title>
<script src="http://code.jquery.com/jquery-1.11.2.min.js"></script>
<script>
 var person = {
    firstName : "Jane",
    lastName : "Cat"
 };

 document.writeln("First Name: " + person.firstName + "<br/>");
 document.writeln("Last Name: " + person.lastName + "<br/>");
 document.writeln("Phone : " + person.phone + "<br/>");
</script>
</head>
<body>
</body>
</html>
Friday, April 3, 2015
JSON is becoming the standard way to exchange data in a relatively short amount of time. The reason is because JSON is easier to work with than XML.
JSON Object:
JSON Object:
- JSON object is made up of name/value pairs
Single Object:
{ "firstName" : "John"}
Thursday, April 2, 2015
Cropping an image is something that you will do often when you want to take out parts of the photo is uninteresting or distracting. For this blog we will be using the Key West photo that we resized in this blog.

Tuesday, March 31, 2015
Resizing images is a common task that you have to do to show your photo image on a website. Most digital camera or smart phones takes photos that are a lot larger than what most web sites can display in it's original size. In this blog we will show you how to resize your photo in GIMP.
Step By Step Instructions:
1. Open the original photo in GIMP
Step By Step Instructions:
1. Open the original photo in GIMP
Monday, March 30, 2015
Most new users to GIMP gets intimidated with the floating windows that is the default view when you first open GIMP.
Thursday, March 26, 2015
There are times when you see a class property without it's private member counterpart and all you see is the {set; get;} accessors. What you are looking at are auto properties that you can create in C#, the only requirements is that the set; and get; accessors contains no logic. Usually there are private members that the properties expose to other classes using the get/set accessors, like the code below:
    public class Product
    {
        private int productId;
        private string name;
        private string description;
        private decimal price;

        public int ProductId
        {
            get
            { return productId; }
            set
            {
                productId = value;
            }
        }

        public string Name
        {
            get
            { return name; }
            set
            {
                name = value;
            }
        }

        public string Description
        {
            get
            { return description; }
            set
            {
                description = value;
            }
        }

        public decimal Price
        {
            get
            { return price; }
            set
            {
                price = value;
            }
        }

    }
Wednesday, March 25, 2015
In this blog I will go over how to set up jQuery for your web pages. There are two methods to using jQuery. The first is the use the CDN URLs that are hosted by jQuery, Google, and Microsoft just to name a few. In this tutorial we will set the CDN from Google. The process should be the same for jQuery and Microsoft CDNs.
1.x snippet: 2.x snippet:
You might be wondering why there are two versions of jQuery 1.x and 2.x, they both use the same APIs and they pretty much mirror each other on a release basis. The only difference is that the 2.x versions does not support IE 6,7, or 8. Just to be on the safe side I always use the 1.x versions.
Here are the URL for Google's jQuery Library:
https://ajax.googleapis.com/ajax/libs/jquery/1.11.2/jquery.min.js
https://ajax.googleapis.com/ajax/libs/jquery/2.1.3/jquery.min.jsYou might be wondering why there are two versions of jQuery 1.x and 2.x, they both use the same APIs and they pretty much mirror each other on a release basis. The only difference is that the 2.x versions does not support IE 6,7, or 8. Just to be on the safe side I always use the 1.x versions.
Tuesday, March 24, 2015
Since Ubuntu does not configure the root account by default you have to manually assign root a password before you can use the root account. However, there's a way to log in as "root" without setting up the "root" password. The way to do this is to use the "sudo" and "su" command in combination. The "sudo" elevates your privileges to root like priviledges, while the "su" command is used to switch from one user to another. So when used together you get to log in as "root".
So in your Linux prompt type in the following command
sudo su
So in your Linux prompt type in the following command
sudo su
Monday, March 23, 2015
In the previous blog we went over how to create a simple ASP.NET MVC 4 application. In this blog we will go over the steps to upgrade our ASP.NET MVC 4 application to ASP.NET MVC 5 application.
Step-By-Step Instructions:
Step-By-Step Instructions:
- Open the "MyMVC4" project that you've created on the last blog
- Right click on the project and select "Manage NuGet Packages..."
In this blog we will go over how to upgrade your existing project which uses ASP.NET MVC 4 to ASP.NET MVC 5 using NuGet. During the upgrade you will encounter some errors but they are easy enough to fix by changing the Web.Config file. In the first blog we will create a simple ASP.NET MVC 4 application from scratch.
But first thing is first let's begin by creating a project in ASP.NET MVC 4:
But first thing is first let's begin by creating a project in ASP.NET MVC 4:
- Create a blank solution in Visual Studio call "MVCProjects"
Apache (HTTPD) is the most popular web server on the web right now. It is from the Apache Software Foundation. A web server serves content to the web. The power of Apache lies in it's modules which allows you to process scripting languages such as Perl, and PHP.
In this blog we will go over how to install the Apache Http Web Server on the Ubuntu Server:
1. In the terminal type in the following command
apt-cache search apache | more
In this blog we will go over how to install the Apache Http Web Server on the Ubuntu Server:
1. In the terminal type in the following command
apt-cache search apache | more
Sunday, March 22, 2015
There times when you have to store data as XML in a SQL Server database table. In this blog we will go over how to store XML as data in SQL Server. There's an xml data type in SQL Server that we can use to store XML data.
Example: Create a database table that contains a column to store XML data using the xml data type
If you look at the "Book" column for the table "Books" you will see that it has a data type of XML
Example: Create a database table that contains a column to store XML data using the xml data type
CREATE TABLE Books
(
  Id INT NOT NULL IDENTITY(1,1) PRIMARY KEY,
  Book XML NOT NULL
);
If you look at the "Book" column for the table "Books" you will see that it has a data type of XML
Saturday, March 21, 2015
Friday, March 20, 2015
IF SomeCondition
  BEGIN
    -- Execute some code here
  END
ELSE
  BEGIN
   -- Execute some code here
  END
Else is optional
Thursday, March 19, 2015
Once you've graduated from the basic variables in JavaScript the next variable you want to learn is the JavaScript array. An array is a group of variables in a list or collection. However, you want to word it. As with everything else a JavaScript array is mutable, meaning you can change it dynamically while you are working on it.
Declaring an Array
Declaring an Array In Literal Format
Declaring an Array
var alphabet = new Array();

alphabet [0] = 'A';
alphabet [1] = 'B';
alphabet [2] = 'C';
Declaring an Array In Literal Format
var alphabet = ['A','B','C']
Wednesday, March 18, 2015
JavaScript objects acts differently than objects in the object-oriented programming world. A JavaScript object is mutable meaning it can be changed and is dynamic.
Here is how you would create a JavaScript object:
Or you can create a JavaScript object in a literal format
Here is how you would create a JavaScript object:
   var Employee = new Object();

   Employee.ID = 1;
   Employee.FirstName = "Jeff";
   Employee.LastName = "Jordan";
You create a new object the new Object() constructor
Or you can create a JavaScript object in a literal format
   var Employee = {
      ID: 1,
      FirstName: "Jeff",
      LastName: "Jordan"
};
You can also include a function as a method in your object like the example below
   var Employee = {
      ID: 1,
      FirstName: "Jeff",
      LastName: "Jordan",

      displayEmployee: function() {
          document.writeln("Employee ID: " + this.ID);
          document.writeln("First Name: " + this.FirstName);
          document.writeln("Last Name: " + this.LastName);
};
Tuesday, March 17, 2015
T-SQL variables allows you to store and assign values in your T-SQL code. Variables is a storage unit in programming which allows you to refer back to it at a later time.
T-SQL variables have the following characteristics:
As you can see from the above example you can declare a single variable or declare multiple variables with a comma separated list.
T-SQL variables have the following characteristics:
- Local variables must be prefixed @
- Global variables must be prefixed with @@
- Must be declared with the DECLARE statement
- Must specify the data type when declared
    DECLARE @employeeID INT;
    DECLARE @firstName CHAR(10), @lastName CHAR(20);
As you can see from the above example you can declare a single variable or declare multiple variables with a comma separated list.
Monday, March 16, 2015
Start up your Linux machine then do the following:


- Press Ctrl + Alt + F2 to start a virtual console
- Login in with your credentials
3. After logging in type "grep my-username-goes-here /etc/passwd", then you will see which shell environment you are using
Sunday, March 15, 2015
log4net is the most commonly used ASP.NET logging package. It is robust and flexible in it's features. You can choose to log your errors on the database or in a log file or multiple log files. However, it is not as straight forward to set up. In this blog we will go through the steps to install log4net using NuGet Package Manager.
1. Create an empty web project, and call it whatever you like, below is the settings that I have, then click "OK"


1. Create an empty web project, and call it whatever you like, below is the settings that I have, then click "OK"
2. Right click on the solution and select "Manage NuGet Packages for Solution..."
3. Locate the search box on the left hand side
4. Type "log4net" in the search box, the latest log4net version will show up in the search results in the main window. Click on the "Install" button.
5. Select the project that you want log4net to be installed, then click "OK"
6. After the installation under "References" log4net will be added
7.
Saturday, March 14, 2015
If you've installed an operating system in VirtualBox before you've probably noticed the screen is really small even when you switch to Fullscreen mode. It's so small that you can't even see the fonts for the icons if you have a desktop GUI installed. To fix this problem VirtualBox provides us with the Guest Additions tool. Which enables the virtual machine to be viewed at fullscreen.
To enable full screen on a Linux operating system. Perform the following actions, this should work on all Linux distribution that VirtualBox supports.
1. Start the virtual machine that you want to make full screen

To enable full screen on a Linux operating system. Perform the following actions, this should work on all Linux distribution that VirtualBox supports.
1. Start the virtual machine that you want to make full screen
Friday, March 13, 2015
The topic of installing a desktop GUI has been debated over the years. Friendships have been ruined because of it. I don't know if that's true, but some believe that the server should only have command line. This blog is not about that debate, I just want to see some freaking graphics on the monitor, and for my mouse to be more than a paper weight. So there's my opinion on the subject.
Anyways installing a GUI on Ubuntu server is really easy.
Here are the steps:
1. Start up your Ubuntu server VM
Anyways installing a GUI on Ubuntu server is really easy.
Here are the steps:
1. Start up your Ubuntu server VM
Thursday, March 12, 2015
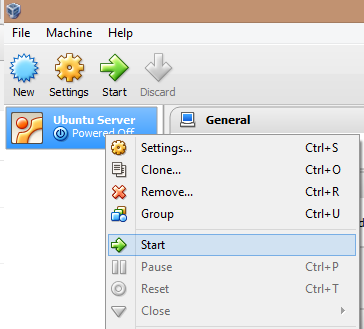
In the previous two blogs we've gone through the steps to setting up the virtual machine to install the Ubuntu Server on VirtualBox, in this blog we will go over the steps to installing the Ubuntu Server. Be warn this is a long blog. I usually try to break up my blog so that you won't doze off, but I feel like this one has be left in tack. Here are the steps to install Ubuntu Server on your VirtualBox.
1. Right click on the "Ubuntu Server" virtual machine and select "Start"
1. Right click on the "Ubuntu Server" virtual machine and select "Start"

Wednesday, March 11, 2015
In the last blog we've created a new virtual machine that is ready for a Ubuntu Server operating system. Now we will install the Ubuntu Server operating system on that virtual machine. Here are the steps you need to take to install a Ubuntu Server operating system on that virtual machine.
1. Right click the "Ubuntu Server" virtual machine, then select "Settings"

1. Right click the "Ubuntu Server" virtual machine, then select "Settings"
Tuesday, March 10, 2015
If you are a developer on a shoestring budget, Linux is the way to go if you want to compete with the big boys. I have nothing against Microsoft, I actually love it a lot on the job. But when you want to start a personal project, Linux is the way to go, to get the most bang for the buck.
Ubuntu has always been great at offering enterprise level server products for free. A lot of what you learn with Ubuntu or any server side Linux distribution you can translate into the Windows environment quite easily. So it's worth the effort.
But before you can do all that you need the Ubuntu server environment up and running. Instead of going the dual boot route you can have your Windows OS as your main OS and run Ubuntu on a virtual machine, that's where VirtualBox comes in. So let's begin our journey into the world of enterprise Linux.
- First thing you need is the latest Ubuntu server distribution, you can get it here http://www.ubuntu.com/download/server

Monday, March 9, 2015
Transaction processing is a concept in SQL that allows you to execute a query or rollback the changes if something goes wrong. A way of enforcing the data integrity of the database. As such, you can only rollback INSERT, UPDATE, and DELETE. Not that there's any use in rolling back a SELECT statement because there's no change in data.
The following is how you would wrap a transaction around a DELETE statement:
(1 row(s) affected)
If you are dealing with multiple statements then you can use the SAVE TRANSACTION, SAVE TRANSACTION allows you to create a placeholder so that you can rollback a transaction at a checkpoint.
The following is how you would wrap a transaction around a DELETE statement:
BEGIN TRANSACTION
DELETE Products WHERE ProductID = 87
COMMIT TRANSACTION
The above query will only execute if there are no errors, if there's an error the transaction will be rolled back. That's it, that's the whole concept of what a transaction is, if there are no errors then you should get the following message.
(1 row(s) affected)
If you are dealing with multiple statements then you can use the SAVE TRANSACTION, SAVE TRANSACTION allows you to create a placeholder so that you can rollback a transaction at a checkpoint.
In the last blog we just selected the Products entities from the NorthwindEntities with this Linq Query.
It gets the job done but, the GridView displays the CategoryID and SupplierID as integers, which is not very useful to your users. Plus, we don't want to display the ProductID.
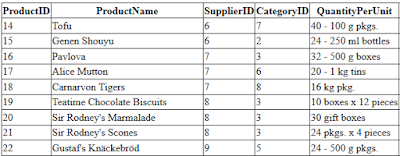
var query = from prod in nwctx.Products
         select prod;
It gets the job done but, the GridView displays the CategoryID and SupplierID as integers, which is not very useful to your users. Plus, we don't want to display the ProductID.

Wednesday, March 4, 2015
The SOUNDEX function is a cool function that you can talk about at your next dinner party. It searches for the words that sounds the same but are not. Like the query below, which queries product names that sounds like the word "Chief" in the Northwind Products table.
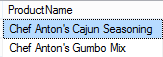
SELECT ProductName
FROM Products
WHERE SOUNDEX(ProductName) = SOUNDEX('Chief')
Monday, March 2, 2015
As you may have guessed the SQL mathematical operators are equivalent to their regular mathematical counter parts.
1. Addition

- + Addtion
- - Subtraction
- * Multiplication
- / Division
Eamples:
SELECT UnitPrice, (UnitPrice + 20) AS RipOffPrice
FROM Products
Sunday, March 1, 2015
Concatenation means combining the value of two or more columns together to form a single value. The most common usage for this operation is to combine the first name and last name field. Like the query below.
The query above concatenates the FirstName and LastName column from the Employees table in the
Northwind database and assign the alias Name to combined value.
  SELECT FirstName + ' ' + LastName AS Name
  FROM Employees
The query above concatenates the FirstName and LastName column from the Employees table in the
Northwind database and assign the alias Name to combined value.
Friday, February 27, 2015
Oracle VM VirtualBox is a great virtualization software, and the best part about it is that it's free. If you have a Windows operating system and you want to explorer Linux and UNIX distributions for fun, then VirtualBox is the way to go.
Here are the steps to install VirtualBox on your machine:

Here are the steps to install VirtualBox on your machine:
- Go to https://www.virtualbox.org/wiki/Downloads to download the latest version of VirtualBox for your operating system.
Thursday, February 19, 2015
Arrays are fixed size elements of a type, arrays are stored next to each other in the memory. Making them very fast and efficient. However you must know the exact size of an array when you declare an array.
Declaring an array:
Declaring an array:
string[] names = new string[5];There are two ways you can assign values to an array. The first is to assign the values individually by specify the index of the array inside a square bracket. The index is the position of element in the array. Index starts with 0.
names[0] = "George";
names[1] = "James";
names[2] = "Arthur";
names[3] = "Eric";
names[4] = "Jennifer";
Tuesday, February 17, 2015
Sometimes you need to call a stored procedure that only returns one value. It would be overkill to use the SqlDataReader to store just one value. You can use the SqlCommand.ExecuteScalar() method instead to retrieve just one value from the database.
Here is how you would call the "GetProductsAvgPrice" stored procedure in the Northwind database.
1. First you need create a stored procedure in the SQL Server that will return just one value the average price of products in Products table in the Northwind database. Run this code in the SQL Server query editor window
2. In your C# code file you need the namespaces
Here is how you would call the "GetProductsAvgPrice" stored procedure in the Northwind database.
1. First you need create a stored procedure in the SQL Server that will return just one value the average price of products in Products table in the Northwind database. Run this code in the SQL Server query editor window
USE Northwind;
GO
CREATE PROCEDURE GetProductsAvgPrice
AS
    SELECT AVG(UnitPrice)
    FROM Products;
GO
2. In your C# code file you need the namespaces
using System.Web.Configuration;
using System.Data.SqlClient;
using System.Data;
In SQL Server type in the following command in the Query Window:
The command above grants execution permission for user "NT AUTHORITY\NETWORK SERVICE" on the stored procedure dbo.GetProducts
dbo = owner schema
GetProducts = name of stored procedure
"NT AUTHORITY\NETWORK SERVICE" = user that IIS uses to access SQL Server
USE Northwind;
Grant EXEC ON OBJECT::dbo.GetProducts TO "NT AUTHORITY\NETWORK SERVICE";
GO
The command above grants execution permission for user "NT AUTHORITY\NETWORK SERVICE" on the stored procedure dbo.GetProducts
dbo = owner schema
GetProducts = name of stored procedure
"NT AUTHORITY\NETWORK SERVICE" = user that IIS uses to access SQL Server
The INSERT SELECT is an INSERT statement that inserts value using a SELECT statement. The following query will insert a new customer using existing record.
INSERT INTO [dbo].[Customers]
           ([CustomerID],
     [CompanyName]
           ,[ContactName]
           ,[ContactTitle]
           ,[Address]
           ,[City]
           ,[Region]
           ,[PostalCode]
           ,[Country]
           ,[Phone]
           ,[Fax])
   SELECT   'OPDS',
      CompanyName,
      ContactName,
      ContactTitle,
      Address,
      City,
      Region,
      PostalCode,
      Country,
      Phone,
      Fax
FROM Customers
WHERE CustomerID = 'ALFKI'
Monday, February 16, 2015
Today we will be calling a stored procedure in SQL Server that we've created earlier in this blog call selProductsBySupplierID. The stored procedure takes one input parameter call @SupplierID which takes an int.
The UNION operator combines two or more SELECT statements into one result set. The SELECT list must be the same in all queries, same columns, expressions, functions, and data types. All UNION queries can be replaced with a join query.
The query below combines the Customers select statement with with the Employees statement
SELECT City,Address
FROM Customers
UNION
SELECT City,Address
FROM Employees
Sunday, February 15, 2015
FULL OUTER JOIN is a join that returns all the results from the left hand side of the = sign and all the results of the right hand side.
For example this query returns all the customers and all the orders in one result
SELECT c.ContactName, o.OrderID
FROM Customers c
FULL OUTER JOIN Orders o
ON c.CustomerID=o.CustomerID
ORDER BY c.ContactName
Saturday, February 14, 2015
In most of your projects you will have to work with stored procedures. As a developer most of the time you only have to concern yourself with the basic stored procedures such as the SELECT, INSERT, UPDATE, and DELETE stored procedures. If there's a DBA then you will probably be handed a stored procedure written by the database god. But if you are the only developer in the five mile radius you might have to get your hands dirty and roll your own stored procedure. In this tutorial we will be creating a select stored procedure.
If you look at the Employees table in the Northwind database diagram you will see that there's a relationship that links to itself
Friday, February 13, 2015
Here is how you would create a stored procedure to update an a new record into the Products table in the Northwind database.
USE Northwind
GO
CREATE PROCEDURE dbo.updProduct(
 @ProductID int,
 @ProductName nvarchar(40),
 @SupplierID int = null,  --default is null
 @CategoryID int = null,
 @QuantityPerUnit nvarchar(20) = null,
 @UnitPrice money = null,
 @UnitsInStock smallint = null,
 @UnitsOnOrder smallint = null,
 @ReorderLevel smallint = null,
 @Discontinued bit)
AS
UPDATE Products
 SET ProductName = @ProductName,
  SupplierID = @SupplierID,
  CategoryID = @CategoryID,
  QuantityPerUnit = @QuantityPerUnit,
  UnitPrice = @UnitPrice,
  UnitsInStock = @UnitsInStock,
  UnitsOnOrder = @UnitsOnOrder,
  ReorderLevel = @ReorderLevel,
  Discontinued = @Discontinued
WHERE Products.ProductID = @ProductID
GO
Thursday, February 12, 2015
This is part three of our series on Entity Framework. In the last blog we went over how to create an Entity Framework model with the Northwind database. Now we are going to use that model in our ASP.NET by binding the Entity objects that have created to a GridView in our "Northwind" ASP.NET project. Usually we would put the Entity Framework model in a class library project and use it as our data access layer, but for simplicity I've decided to put in the same project as the ASP.NET pages.
Below are the directions on how to use the Entity objects in our web pages.
1. Create "Default.aspx" page in the "Northwind" web project.

Below are the directions on how to use the Entity objects in our web pages.
1. Create "Default.aspx" page in the "Northwind" web project.
To create the delete procedure type in the following code in the SQL editor window in "Microsoft SQL Server Management Studio"
The stored procedure only takes in one input parameter which is the ProductID, the DELETE statement needs a ProductID because if there is no WHERE clause, every record in the product in the Products table will be deleted. Make sure you backup the table before you work with a DELETE stored procedure.
Here is how would execute the stored procedure
Blogs In the T-SQL Series:
USE Northwind
GO
CREATE PROCEDURE dbo.delProduct @ProductID int
AS
DELETE FROM Products
WHERE Products.ProductID = @ProductID
GO
The stored procedure only takes in one input parameter which is the ProductID, the DELETE statement needs a ProductID because if there is no WHERE clause, every record in the product in the Products table will be deleted. Make sure you backup the table before you work with a DELETE stored procedure.
Here is how would execute the stored procedure
EXEC dbo.delProduct 78
Blogs In the T-SQL Series:
- T-SQL: Stored Procedure (INSERT), INSERT A New Product In Northwind Part 1
- ASP.NET : Stored Procedures (INSERT), Insert a new Northwind Product Part 2
- T-SQL: Stored Procedures (DELETE), DELETE An Existing Northwind Product Part 3
- T-SQL: Stored Procedures (UPDATE), UPDATE An Existing Product In Northwind Part 4
- T-SQL: Stored Procedures (SELECT), SELECT Products and The Supplier Part 5
- ASP.NET: Calling Stored Procedure With A Parameter With SqlParameter Part 6
- ASP.NET: Get a Single Value From a Stored Procedure Part 7
- SQL Server: Granting Access Permissions to Stored Procedures For IIS Part 8
Wednesday, February 11, 2015
This is part two of our series on Entity Framework, if you would like to catch up with what we did on on part one, feel free to go over the lesson so that you can follow along.
In the last part we installed Entity Framework 6.1.1 with NuGet package management tool in Visual Studio. In this lesson we will learn to create an Entity Model using the Northwind database. Follow the steps below.
In the last part we installed Entity Framework 6.1.1 with NuGet package management tool in Visual Studio. In this lesson we will learn to create an Entity Model using the Northwind database. Follow the steps below.
- Add a new folder call "Models" in the "Northwind" database

Today we will be calling a stored procedure in SQL Server that we've created earlier in this blog call addProduct. The stored procedure takes the following input parameters.

1. First you need the namespaces
2. Then get the Northwind connection string value from the Web.config file
3. Now call the stored procedure and output the result from the SqlDataReader
Blogs In the T-SQL Series:
1. First you need the namespaces
using System.Web.Configuration;
using System.Data.SqlClient;
using System.Data;
2. Then get the Northwind connection string value from the Web.config file
string connectString = WebConfigurationManager.ConnectionStrings["NorthwindConnectionString"].
ConnectionString;
3. Now call the stored procedure and output the result from the SqlDataReader
  using (SqlConnection conn = new SqlConnection(connectString))
  {
            conn.Open();
            SqlCommand cmd = new SqlCommand();
            cmd.CommandText = "addProduct";
            cmd.CommandType = CommandType.StoredProcedure;
            cmd.Connection = conn;

            SqlParameter productName = new SqlParameter("@ProductName", "Teh");
            productName.SqlDbType = SqlDbType.NVarChar;
            productName.Direction = ParameterDirection.Input;
            cmd.Parameters.Add(productName);

            SqlParameter supplerID = new SqlParameter("@SupplierID", 1);
            supplerID.SqlDbType = SqlDbType.Int;
            supplerID.Direction = ParameterDirection.Input;
            cmd.Parameters.Add(supplerID);

            SqlParameter categoryID = new SqlParameter("@CategoryID", 1);
            categoryID.SqlDbType = SqlDbType.Int;
            categoryID.Direction = ParameterDirection.Input;
            cmd.Parameters.Add(categoryID);

            SqlParameter quantityPerUnit = new SqlParameter("@QuantityPerUnit", "20 boxes of 12 oz.");
            quantityPerUnit.SqlDbType = SqlDbType.NVarChar;
            quantityPerUnit.Direction = ParameterDirection.Input;
            cmd.Parameters.Add(quantityPerUnit);

            SqlParameter unitPrice = new SqlParameter("@UnitPrice", 12.99);
            unitPrice.SqlDbType = SqlDbType.Money;
            unitPrice.Direction = ParameterDirection.Input;
            cmd.Parameters.Add(unitPrice);

            SqlParameter unitsInStock = new SqlParameter("@UnitsInStock", 6);
            unitsInStock.SqlDbType = SqlDbType.SmallInt;
            unitsInStock.Direction = ParameterDirection.Input;
            cmd.Parameters.Add(unitsInStock);

            SqlParameter reorderLevel = new SqlParameter("@ReorderLevel", 2);
            reorderLevel.SqlDbType = SqlDbType.SmallInt;
            reorderLevel.Direction = ParameterDirection.Input;
            cmd.Parameters.Add(reorderLevel);

            SqlParameter discontinued = new SqlParameter("@Discontinued", false);
            discontinued.SqlDbType = SqlDbType.Bit;
            discontinued.Direction = ParameterDirection.Input;
            cmd.Parameters.Add(discontinued);

            int rowsAffected = cmd.ExecuteNonQuery();

            Response.Write(rowsAffected);
    }
In the above code you add the parameters required by the addProduct stored procedure. You specify the name, type, and value. Then add it to command object's parameters list. Then you execute the ExecuteNonQuery() method because you are not get a resultset back or a scalar value. The ExecuteNonQuery() method returns an int value, usually the rows that were affected value.
Blogs In the T-SQL Series:
- T-SQL: Stored Procedure (INSERT), INSERT A New Product In Northwind Part 1
- ASP.NET : Stored Procedures (INSERT), Insert a new Northwind Product Part 2
- T-SQL: Stored Procedures (DELETE), DELETE An Existing Northwind Product Part 3
- T-SQL: Stored Procedures (UPDATE), UPDATE An Existing Product In Northwind Part 4
- T-SQL: Stored Procedures (SELECT), SELECT Products and The Supplier Part 5
- ASP.NET: Calling Stored Procedure With A Parameter With SqlParameter Part 6
- ASP.NET: Get a Single Value From a Stored Procedure Part 7
- SQL Server: Granting Access Permissions to Stored Procedures For IIS Part 8
Tuesday, February 10, 2015
Here is how you would create a stored procedure to insert a new record into the Products table in the Northwind database.
When you see a parameter with the = null, it means the field can have a null value. Since the ProductID is auto incremented you don't include it. The data types must match the fields in the database.
Here is how you would execute the stored procedure
When you see a parameter with = DEFAULT it means to assign the DEFAULT value to the field, if the execution is completed successfully you should see the message.
(1 row(s) affected)
Blogs In the T-SQL Series:
USE Northwind
GO
CREATE PROCEDURE dbo.addProduct(
 @ProductName nvarchar(40),
 @SupplierID int = null,  --default is null
 @CategoryID int = null,
 @QuantityPerUnit nvarchar(20) = null,
 @UnitPrice money = null,
 @UnitsInStock smallint = null,
 @UnitsOnOrder smallint = null,
 @ReorderLevel smallint = null,
 @Discontinued bit)
AS
INSERT INTO Products(ProductName,
 SupplierID,
 CategoryID,
 QuantityPerUnit,
 UnitPrice,
 UnitsInStock,
 UnitsOnOrder,
 ReorderLevel,
 Discontinued)
VALUES(@ProductName,
 @SupplierID,
 @CategoryID,
 @QuantityPerUnit,
 @UnitPrice,
 @UnitsInStock,
 @UnitsOnOrder,
 @ReorderLevel,
 @Discontinued)
GO
When you see a parameter with the = null, it means the field can have a null value. Since the ProductID is auto incremented you don't include it. The data types must match the fields in the database.
Here is how you would execute the stored procedure
EXEC dbo.addProduct @ProductName ='Teh',
 @SupplierID = DEFAULT,
 @CategoryID = DEFAULT,
 @QuantityPerUnit ='20 boxes x 12 oz.',
 @UnitPrice = 12.99,
 @UnitsInStock = 5,
 @UnitsOnOrder = 6,
 @ReorderLevel = DEFAULT,
 @Discontinued = 0
When you see a parameter with = DEFAULT it means to assign the DEFAULT value to the field, if the execution is completed successfully you should see the message.
(1 row(s) affected)
Blogs In the T-SQL Series:
- T-SQL: Stored Procedure (INSERT), INSERT A New Product In Northwind Part 1
- ASP.NET : Stored Procedures (INSERT), Insert a new Northwind Product Part 2
- T-SQL: Stored Procedures (DELETE), DELETE An Existing Northwind Product Part 3
- T-SQL: Stored Procedures (UPDATE), UPDATE An Existing Product In Northwind Part 4
- T-SQL: Stored Procedures (SELECT), SELECT Products and The Supplier Part 5
- ASP.NET: Calling Stored Procedure With A Parameter With SqlParameter Part 6
- ASP.NET: Get a Single Value From a Stored Procedure Part 7
- SQL Server: Granting Access Permissions to Stored Procedures For IIS Part 8
Saturday, February 7, 2015
As a developer we always forget how to query for records with NULL values, no matter how many times we do it. It's just weird. Our first instinct is to write the query as such
But that will not return any results. The funny thing is there's no SQL error so you think that there's no results. However if you change the query to this
You see there's plenty of records with Region IS NULL

The reverse is true if you want records that are not NULL you would not write the query like this
But you want to write the query like this instead
   SELECT CompanyName, ContactName, ContactTitle,Region
   FROM Customers
   WHERE Region = NULL
But that will not return any results. The funny thing is there's no SQL error so you think that there's no results. However if you change the query to this
   SELECT CompanyName, ContactName, ContactTitle,Region
   FROM Customers
   WHERE Region IS NULL
You see there's plenty of records with Region IS NULL

The reverse is true if you want records that are not NULL you would not write the query like this
   SELECT CompanyName, ContactName, ContactTitle,Region
   FROM Customers
   WHERE Region != NULL
But you want to write the query like this instead
   SELECT CompanyName, ContactName, ContactTitle,Region
   FROM Customers
   WHERE Region IS NOT NULL
Subscribe to:
Posts (Atom)


