Latest Posts
Thursday, July 29, 2021
In this post we are going to create our first Entity Framework migration and creating an actual database in MySQL.
In order to do that we need to add a few NuGet packages to our Asp.Net Core project including the Entity Framework Core package. But, before we do that we want to find out what what version of .NET Core we are running. Obviously I have it memorized, but for the rest of you, you can type the command dotnet --version to figure out what the version is :) It's always a good idea to try and match the package version with the .NET Core runtime you have. It's one of the more annoying thing with Angular and Asp.Net Core, it's changing constantly. So as you can see my version 3.1.xxx so I should try to install packages that are made for 3.1.x.

The first package we are going to install is the Microsoft.EntityFrameworkCore. So open the ACMEBank.API project with Visual Studio Code. Press Ctrl+Shift+P and type NuGet and select

Thursday, July 8, 2021
Before we run our Asp.Net Core application for the first time we are going to copy a controller from Asp.Net Core 2.2 to help us create the skeleton for our application. A skeleton are the plumbings we do at the beginning of our application to make sure all the mechanisms work. It's called the ValuesController which has been replaced with a more complicated WeatherForecastController. The ValuesController is just a lot easier to work with to get things set up.
using System;
using System.Collections.Generic;
using System.Linq;
using System.Threading.Tasks;
using Microsoft.AspNetCore.Mvc;

namespace ACMEBank.API.Controllers
{
    [Route("api/[controller]")]
    [ApiController]
    public class ValuesController : ControllerBase
    {
        // GET api/values
        [HttpGet]
        public ActionResult> Get()
        {
            return new string[] { "value1", "value2" };
        }

        // GET api/values/5
        [HttpGet("{id}")]
        public ActionResult Get(int id)
        {
            return "value";
        }

        // POST api/values
        [HttpPost]
        public void Post([FromBody] string value)
        {
        }

        // PUT api/values/5
        [HttpPut("{id}")]
        public void Put(int id, [FromBody] string value)
        {
        }

        // DELETE api/values/5
        [HttpDelete("{id}")]
        public void Delete(int id)
        {
        }
    }
}
Thursday, July 1, 2021
For those of you who works with Visual Studio, working with C# comes out of the box, but with Visual Studio Code you need to install some extensions from the Marketplace to make it suitable for C# development.
Here are the extensions you need to install:
- C#: This extension by Microsoft gives us IntelliSense, references, code editing and highlighting and debugging support

- C# Extensions: This extension let's you create C# files, like classes and interfaces also some keyboard shortcuts like creating. This one seems to be no longer in development for a long time, but it works fine.

- NuGet Package Manager: This extension let's us install new NuGet packages which we will need from time to time.

Wednesday, March 22, 2017
Here are the steps to seed the NorthwindCafe database:
1. Create a file call DBInitializer in the NorthwindCafe.Web folder, in the file type in the following code
using System.Linq;

namespace NorthwindCafe.Web.Models
{
    public class DbInitializer
    {
        public static void Initialize(NorthwindContext context)
        {
            context.Database.EnsureCreated();

            if(context.Categories.Any())
            {
                return;
            }

            var categories = new Category[]
            {
               new Category {Name = "Coffee", Description="Coffee", Products = new Product[] { new Product { Name = "Dark Roast", Description = "Dark Roast", Price = 2.0M } } },
               new Category {Name = "Tea", Description="Tea", Products = new Product[] { new Product { Name = "Chai", Description = "Chai", Price = 1.5M } } },
               new Category {Name = "Pastry", Description="Pastry", Products = new Product[] { new Product { Name = "Cupcake", Description = "Cupcake", Price = 1.25M } } },
               new Category {Name = "Food", Description = "Food", Products = new Product[] { new Product  { Name = "Hamburger", Description = "Hamburger", Price = 5.0M } } }
            };

            foreach (var c in categories)
            {
                context.Categories.Add(c);

            }

            context.SaveChanges();
        }
    }
}
Monday, July 18, 2016
Sunday, June 19, 2016
First of all here is our markup code in our .aspx page
<%@ Page Language="C#" AutoEventWireup="true"
    CodeBehind="Default.aspx.cs" Inherits="Sandbox.Default" %>

<!DOCTYPE html>

<html xmlns="http://www.w3.org/1999/xhtml">
<head runat="server">
    <title></title>
</head>
<body>
    <form id="form1" runat="server">
    <div>
        <asp:DropDownList ID="DropDownList1" runat="server"></asp:DropDownList>
    </div>
    </form>
</body>
</html>
System.Collections.Generic
Declaration:
Dictionary<string, string> account = new Dictionary<string, string>();
Adding Items:
account.Add("id","1");
account.Add("username", "jackd");
Use in ArrayList: Namespace:
Saturday, June 18, 2016
Step-by-Step Instructions:
1. First we need to add the Entity Framework 6.1.3 to our ASP.NET MVC, we accomplish by right-click on "References" then select "Manage NuGet Packages"
Thursday, March 26, 2015
    public class Product
    {
        private int productId;
        private string name;
        private string description;
        private decimal price;

        public int ProductId
        {
            get
            { return productId; }
            set
            {
                productId = value;
            }
        }

        public string Name
        {
            get
            { return name; }
            set
            {
                name = value;
            }
        }

        public string Description
        {
            get
            { return description; }
            set
            {
                description = value;
            }
        }

        public decimal Price
        {
            get
            { return price; }
            set
            {
                price = value;
            }
        }

    }
Sunday, March 15, 2015
1. Create an empty web project, and call it whatever you like, below is the settings that I have, then click "OK"


Monday, March 9, 2015
var query = from prod in nwctx.Products
         select prod;
It gets the job done but, the GridView displays the CategoryID and SupplierID as integers, which is not very useful to your users. Plus, we don't want to display the ProductID.

Thursday, February 19, 2015
Declaring an array:
string[] names = new string[5];There are two ways you can assign values to an array. The first is to assign the values individually by specify the index of the array inside a square bracket. The index is the position of element in the array. Index starts with 0.
names[0] = "George";
names[1] = "James";
names[2] = "Arthur";
names[3] = "Eric";
names[4] = "Jennifer";
Thursday, February 12, 2015
Below are the directions on how to use the Entity objects in our web pages.
1. Create "Default.aspx" page in the "Northwind" web project.

Tuesday, July 22, 2014
To create a RadioButtonList control do the following:
1. Select the "RadioButtonList" control under the "Standard" control in the "Toolbox" pane on the left.
Monday, July 21, 2014
One of the most commonly used server controls in ASP.NET is the DropDownList control. In this blog I will show you how to bind a list of objects to a DropDownList control.
1. Create a .aspx page
2. Click on the "Toolbox" panel
Friday, July 18, 2014
To create a RadioButtonList control do the following:
1. Select the "RadioButtonList" control under the "Standard" control in the "Toolbox" pane on the left.
Thursday, July 17, 2014
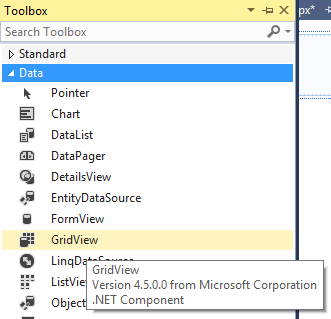
1. Select the "GridView" control from the "Toolbox" pane on the left
Wednesday, July 16, 2014
To set a default value in the DropDownList control follow the steps below.
1. Add the SetDefaultSelectItem method to the code behind file.
protected void SetDefaultSelectItem(string txtSelect)
{
   DropDownList1.Items.FindByText(txtSelect).Selected = true;
}
2. Add a condition to only set the default value on the first page load
protected void Page_Load(object sender, EventArgs e)
{
    if(!Page.IsPostBack)
    {
        BindCategoriesList();
        SetDefaultSelectItem("Seafood");
    }
}
3. If you run the application you will now see that "Seafood" is the default selection on the DropDownList control, when the page first load

- Bind a DataTable To A DropDownList
- (DropDownList) Setting Default Value on First Page Load
- Use The DropDownList Control To Populate GridView
- Bind DropDownList To A List Of Objects
Tuesday, July 15, 2014
1. Create a .aspx page
2. Click on the "Toolbox" panel

Thursday, September 5, 2013
Namespaces:
using System.Web.Configuration;
using System.Data.OracleClient;
using System.Data;
            string cs = WebConfigurationManager.ConnectionStrings["SomeConnectionString"].ConnectionString;

            using (OracleConnection oc = new OracleConnection(cs))
            {
                oc.Open();
                DataTable dt = new DataTable();
                OracleCommand ocmd = new OracleCommand("SELECT * FROM SOMETABLE", oc);
                OracleDataAdapter oda = new OracleDataAdapter(ocmd);

                oda.Fill(dt);

                GridView1.DataSource = dt;
                GridView1.DataBind();

            }
Previous: Oracle Date Format And Compare


