Latest Posts
Wednesday, July 23, 2014
Usually when you use the Query Builder feature to build your query you leave the "*" in the select statement. Th problem with the "*" select statement is that it selects all the columns in the table. This can sometimes make your GridView very big with all the columns in the table being displayed.
In this tutorial we will display only the columns that we want our users to see. This tutorial assumes that you've created a GridView with the "*" selected on the "Northwind", "Products" table.
1. Click on the ">" icon on the right hand side of the GridView control, the "GridView Tasks" panel will appear
In this tutorial we will display only the columns that we want our users to see. This tutorial assumes that you've created a GridView with the "*" selected on the "Northwind", "Products" table.
1. Click on the ">" icon on the right hand side of the GridView control, the "GridView Tasks" panel will appear
Usually when you use the Query Builder feature to build your query you leave the "*" in the select statement. Th problem with the "*" select statement is that it selects all the columns in the table. This can sometimes make your GridView very big with all the columns in the table being displayed.
In this tutorial we will display only the columns that we want our users to see. This tutorial assumes that you've created a GridView with the "*" selected on the "Northwind", "Products" table.
1. Click on the ">" icon on the right hand side of the GridView control, the "GridView Tasks" panel will appear
In this tutorial we will display only the columns that we want our users to see. This tutorial assumes that you've created a GridView with the "*" selected on the "Northwind", "Products" table.
1. Click on the ">" icon on the right hand side of the GridView control, the "GridView Tasks" panel will appear
Tuesday, July 22, 2014
The SqlDataSource control is a data source control that is wizard driven to give you a quick and easy way to connect to the database. It is a great tool to use if you need something quick to show your boss or if you need to set up a quick demo as a proof of concept. Most .NET beginners like to use this data source control because it requires very little coding if any at all. However, if you want to build a real world application you might want to think about creating a data access layer and a business layer to communicate with the database. Imagine if your application gets bigger and each of your GridView uses an SqlDataSource control. Each SqlDataSource has it's own query to maintain. It would be a maintenance nightmare.
The following is a step by step instruction of how to bind a SqlDataSource control to a GridView:
1. Create a new project Web project in Visual Studio
2. Create a new .aspx page
3. Drag the "GridView" control from the "Toolbox" pane in the left hand side to the .aspx design surface
The following is a step by step instruction of how to bind a SqlDataSource control to a GridView:
1. Create a new project Web project in Visual Studio
2. Create a new .aspx page
3. Drag the "GridView" control from the "Toolbox" pane in the left hand side to the .aspx design surface
The RadioButtonList displays a collection of radio buttons on a web page. There can only be one selection in a group of choices at a time. In this tutorial we will create a RadioButtonList and then bind it to the Categories table of the Northwind database using a DataTable.
To create a RadioButtonList control do the following:
1. Select the "RadioButtonList" control under the "Standard" control in the "Toolbox" pane on the left.
To create a RadioButtonList control do the following:
1. Select the "RadioButtonList" control under the "Standard" control in the "Toolbox" pane on the left.
Monday, July 21, 2014
In this part of the tutorial we will bind a DropDownList control to a list of objects. This common practice if you are working with business objects that are mapped to the database table. We will create a business object call "Category" and create a list call "categories" in our .aspx page.
One of the most commonly used server controls in ASP.NET is the DropDownList control. In this blog I will show you how to bind a list of objects to a DropDownList control.
1. Create a .aspx page
2. Click on the "Toolbox" panel
One of the most commonly used server controls in ASP.NET is the DropDownList control. In this blog I will show you how to bind a list of objects to a DropDownList control.
1. Create a .aspx page
2. Click on the "Toolbox" panel
Friday, July 18, 2014
The RadioButtonList displays a collection of radio buttons on a web page. There can only be one selection in a group of choices at a time. In this tutorial we will create a RadioButtonList and then bind it to the Categories table of the Northwind database using a DataTable.
To create a RadioButtonList control do the following:
1. Select the "RadioButtonList" control under the "Standard" control in the "Toolbox" pane on the left.
To create a RadioButtonList control do the following:
1. Select the "RadioButtonList" control under the "Standard" control in the "Toolbox" pane on the left.
Thursday, July 17, 2014
If you work on the DropDownList control, eventually you will be asked to populate some sort of data grid based on the selection on the list. The most common control you have to populate is the GridView control. This tutorial builds from part 1 and part 2 about DropDownList control. So make sure you go through those blogs before you start this one. In this tutorial we will learn how to populate the GridView via a DropDownList selection.
1. Select the "GridView" control from the "Toolbox" pane on the left
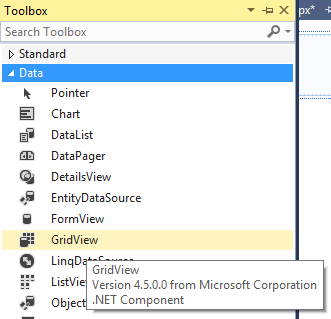
1. Select the "GridView" control from the "Toolbox" pane on the left
Wednesday, July 16, 2014
In part one DropDownList Part 1: Bind a DataTable to A DropDownList we learned how to bind a DataTable to a DropDownList. In this tutorial we will learn to set the default value of the DropDownList control on the page's first load that is before there is a post back to the page. This behavior is commonly used when you want to default the drop down list to a particular selection. Such as the "United States" in a list of countries drop down list.
To set a default value in the DropDownList control follow the steps below.
1. Add the SetDefaultSelectItem method to the code behind file.
2. Add a condition to only set the default value on the first page load

To set a default value in the DropDownList control follow the steps below.
1. Add the SetDefaultSelectItem method to the code behind file.
protected void SetDefaultSelectItem(string txtSelect)
{
   DropDownList1.Items.FindByText(txtSelect).Selected = true;
}
2. Add a condition to only set the default value on the first page load
protected void Page_Load(object sender, EventArgs e)
{
    if(!Page.IsPostBack)
    {
        BindCategoriesList();
        SetDefaultSelectItem("Seafood");
    }
}
3. If you run the application you will now see that "Seafood" is the default selection on the DropDownList control, when the page first load
Related Blogs:
- Bind a DataTable To A DropDownList
- (DropDownList) Setting Default Value on First Page Load
- Use The DropDownList Control To Populate GridView
- Bind DropDownList To A List Of Objects
Tuesday, July 15, 2014
One of the most commonly used server controls in ASP.NET is the DropDownList control. In this blog I will show you how to bind a DataTable to a DropDownList control.
1. Create a .aspx page
2. Click on the "Toolbox" panel

1. Create a .aspx page
2. Click on the "Toolbox" panel
Saturday, July 12, 2014
When you are starting a new project, you might not want to use the templates that Microsoft provided for you. There are times when you want to start off the project with a clean slate. You can create a blank solution in Visual Studio. However, the option to create a blank solution is kind of hidden.
Follow the steps below to create a blank solution:


4. Your blank solution will be displayed in "Solution Explorer"

Follow the steps below to create a blank solution:
- Open Visual Studio 2013, and then click on "File", then select "New", then "Project"
2. Expand the "Other Project Types" node on the left hand navigation, then select "Visual Studio Solutions". Then select the "Blank Solution" template on the right hand side.
3. Give your solution a name and then click "OK"
4. Your blank solution will be displayed in "Solution Explorer"
Subscribe to:
Posts (Atom)


