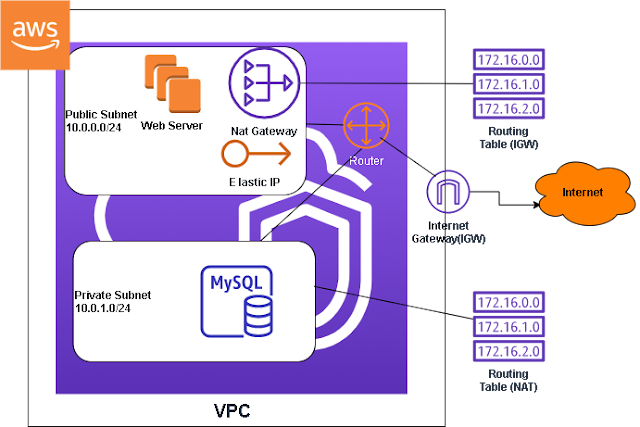
In most scenarios you don't want to expose all of your servers to be public facing. You probably want to configure your network so that only the server that is hosting your web application is public facing. What you want to do is put your web application on the public subnet and your backend servers on the private subnet. This private subnet can access the internet through a NAT gateway for software updates and other functions that require internet access. However, the outside world cannot establish a connection to servers in the private subnet. The NAT gateway resides in the public subnet, acting as a bridge between the public subnet and private subnet.

Each subnet has it's own routing table, the private subnet has a route to the NAT gateway. While the public subnet has a route to the Internet gateway. The Internet gateway in turn has a connection to the internet. Therefore, there's no way for the internet to establish a connection with the private subnet directly, but the private subnet can establish an internet connection with the NAT gateway. It's a one way connection. Only the instances on the public subnet can connect to the instances in the private subnet through port forwarding.
In this post we are going to setup a public subnet, private subnet, and NAT gateway that resides in our VPC. What we are about to configure is comparable to a traditional network infrastructure that would probably take a whole team to accomplish, that's the power of the cloud.
When you create your AWS account a lot of things were created for you by default such a default VPC, subnets and route table. Most of these are the assets that were in the public subnet diagram.
What we want to do is create some of the public assets that were not created by default and create our private subnet.
The first thing we want to do is create a routing table for our private subnet
As you can see a public routing table has already been created, we want to create a routing table for the private subnet. So click on the "Create route table" button.
Give the routing table a name and select the default VPC, then click on the "Create" button
A new routing table is created without any subnet assigned to it yet.
The following are the subnet IP range that's created by default, basically one for every AZ in the VPC.
Looking at the third octet or third . we can see that number goes up by 16 and the biggest number is .80 so the next number will be .96, then .112 and so on. If you don't want to do the math you can go the this
site and calculate the subnet IP address.
Now that we an figure out what the next subnet IP range is, it's time to create our private subnets.
Click on "Subnets", then click on "Create subnet"
Give your subnet a name, assign it the default VPC, choose an AZ and fill in the IPv4 CIDR, from the subnets that's already created we know that the next IP range would be 172.31.96.0/20 click "Create"
Now you want to go back the private routing table that you've created and associate this subnet with it, go to the "Subnets" page and click on the "Subnet Associations" tab and click on "Edit subnet associations"
Assign the private subnet and click "Save"
Now we want to create two instances one in the public subnet and the other one in the private subnet.
I am not going to show you the directions to create an instance, if you don't kn ow how to just follow the directions on this
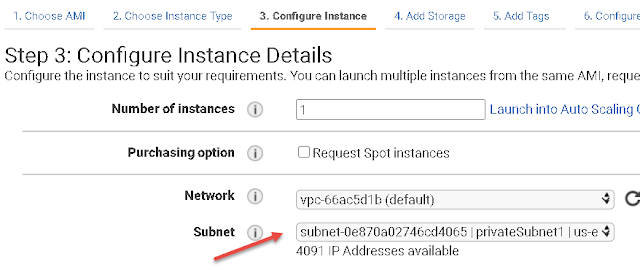
post. There's just one setting that you need for this work, in the initial configuration page there's an option to choose your subnet, make sure one of your instance is in the public subnet and the other one is in the private subnet.

Also in the security group setting make sure that it has SSH access
On the launch screen make sure you assign the same key pair value
You can tell which instance is on the public subnet by looking at the public IP address because only the instances on the public subnet will have a public IP address.
Once we have the two instances, one public and one private we want to connect our public instance to our private instance using SSH. You can follow this
post if you don't know how to. The first thing we have to turn on the SSH Agent with this command. SSH Agent is repository of identity keys that we would need to store our instance key pair in the private subnet. To turn on the SSH Agent type the command
eval `ssh-agent', then change the key pair file's permission with the command
sudo chmod 400 keypairfileAdd the keypair file with the command ssh-add keypairfile
Now we are ready to connect to the instance in our private subnet using SSH Agent Forwarding with this command ssh -A ec2-user@3.221.149.58
Now we can finally connect to the instance in the private subnet with it's private IP address, with the command ssh ec2-user@172.31.3.154 obviously the IP address should be your own private subnet instance IP address


Thanks for this sharing this blog
ReplyDeleteGreat Post Thanx 4 Sharing Sofa Shop in Bhandup west Mumbai
ReplyDeleteAwesome Post I Like It Temple Run 2 Mod Apk
ReplyDeleteWe offer you a selection of unique and professionally embroidered and printed handcrafted wedding accessories at affordable prices.
ReplyDeleteThanks For Sharing The Amazing content. I Will also share with my friends. Great Content thanks a lot
ReplyDeleteLove back Solution Specialist
Vashikaran specialist
Love Vashikaran Specialist
Vashikaran Specialist in India Vashikaran Specialist in Bangalore Vashikaran Specialist in Mumbai Love Vashikaran Specialist in MumbaiBlack magic specialist astrologer
Additionally, yearly reports of the web facilitating organizations, which are public, are a decent source to decide the quality and execution of the web facilitating organization being referred to.https://onohosting.com/
ReplyDeleteGreat Post Thanx 4 Sharing https://brandsofthost.com/
ReplyDeleteFA9B35054E
ReplyDeletekiralık hacker
hacker arıyorum
kiralık hacker
hacker arıyorum
belek