Step By Step Instructions:
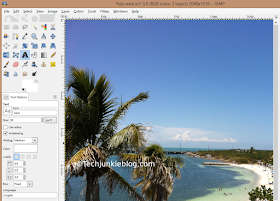
1. Open the original photo in GIMP
As you can see the photo has the dimension of 2048x1530, not suitable for web display
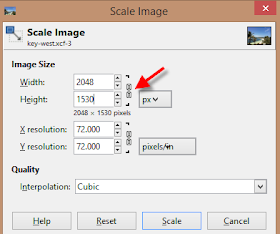
2. Click Image → Scale Image
3. The "Scale Image" dialog box will be displayed. The link icon
4. Type in the new width and height for the image, for this image I am going to type in 600 for the width, the height field will be adjusted automatically to be proportionate with the new width. Note you have to click on the height field for the height to be adjusted. This might be a bug. Click on the "Scale" button, and the image will be resized.
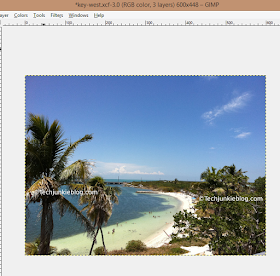
As you can see from the top status bar the image now has the dimension of 600x448
5. Now that we have the resized image we can export our image as a .jpeg file
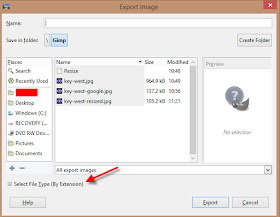
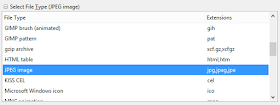
6. To export the image click File → Export As, once the "Export Image" dialog is displayed, expand the "Select File_Type (By Extension)
7. Select "JPEG image" File Type
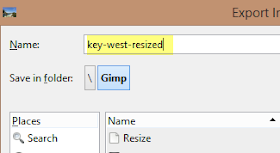
8. In the "Name" field give your resized photo a name.
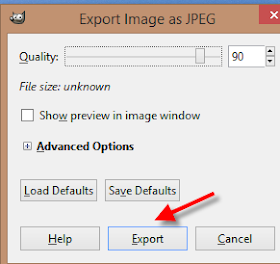
9. Click the "Export" button
10. Accept the default export settings, and then click "Export" again
And here is the resized photo, suitable for the web.



Oh please, do NOT tell people to go via the file-type selector - this is really just for the few cases when you want to export a file with an extension that is not the common one for a type.
ReplyDeleteTo export as file.jpg, just keep the selector as "By extension" and type file.jpg into the file name field.
It's a nice post and very informative, helpful to the learners,thank you for sharing such a blog.
ReplyDeleteBest IT Training in Bangalore
Liên hệ Aivivu, đặt vé máy bay tham khảo
ReplyDeletegiá vé máy bay đi Mỹ khứ hồi
chuyến bay hồi hương từ mỹ về việt nam
đăng ký bay từ canada về Việt Nam
vé máy bay từ nhật về việt nam 2021
giá vé máy bay từ hàn quốc về việt nam
Vé máy bay từ Đài Loan về Việt Nam
Chuyến bay cho chuyên gia nước ngoài
E9CAFABB03
ReplyDeletehacker bulma
kiralık hacker
tütün dünyası
hacker bul
hacker kirala
2A6B641D08
ReplyDeleteSex Hattı
Ücretli Show
Webcam Show